Yellowstone Photography Tours: Where to Shoot and Which Tour Gives You the Best Light
Yellowstone's most photographed subjects, Old Faithful erupting against a blue sky, a wolf pack crossing the Lamar Valley at dawn, Grand Prismatic Spring's alien colors from the overlook, are all accessible on multi-day tours. The question is which tour puts you in the right place at the right time of day, because light and timing determine whether you come home with a snapshot or an image worth printing.
Choose the trip that fits your gateway, available time and actual party needs.
Booking choice: A private 4–5 hour session builds wildlife observation around your photography interests. All guests must be 16+. Meet at Mammoth or confirm pickup; entry extra. This is not a guarantee of every basin or of a particular animal.
Explore Private summer wildlife photo safariWe may earn a commission when you book through these links.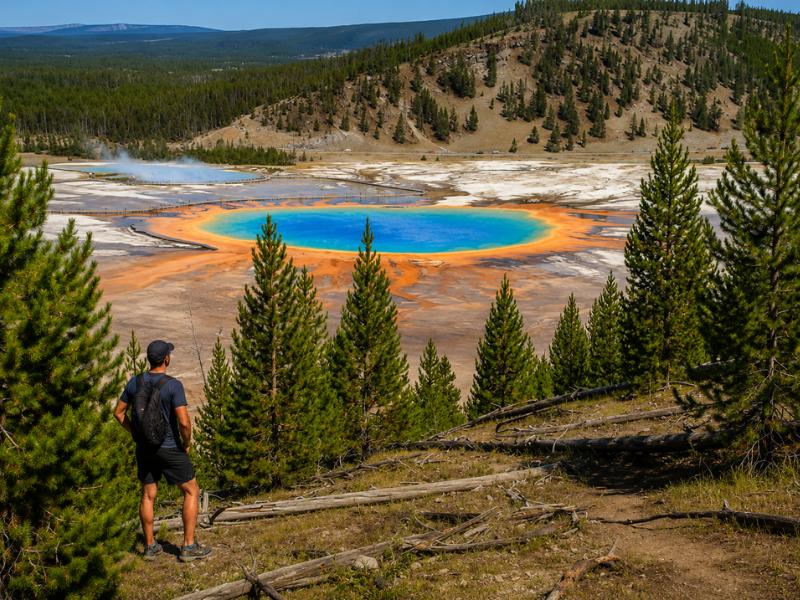
What are Yellowstone's top photography subjects, and where are they?
Yellowstone's essential photography subjects fall into four categories: thermal features (geysers, hot springs, mud pots), wildlife (bison, elk, wolves, bears, moose), landscapes (the Grand Canyon of the Yellowstone, the Teton Range, alpine lakes), and the night sky (Milky Way visibility at 8,000 feet with virtually no light pollution). Each category has specific locations that produce the best images, and those locations are spread across a park that covers 2.2 million acres. No single day trip covers them all. A multi-day tour is how photographers reach each zone at the right time.
| Subject | Best location | Best time of day | Best season |
|---|---|---|---|
| Old Faithful eruption | Upper Geyser Basin boardwalk, south or east benches | Early morning or late afternoon (side light on steam) | Year-round, winter steam is most dramatic |
| Grand Prismatic Spring | Grand Prismatic Overlook trail (0.6 mi out-and-back) | Midday (sun directly overhead reduces steam, reveals colors) | June-September (less steam than cooler months) |
| Wolves | Lamar Valley, from roadside pullouts | Dawn (first 90 minutes of light) | Year-round, winter is best (wolves on snow) |
| Grizzly bears | Hayden Valley, Lamar Valley | Early morning | May-October |
| Bison herds | Hayden Valley, Lamar Valley, roadside park-wide | Golden hour (morning or evening) | Year-round, rut (July-August) is most active |
| Grand Canyon of the Yellowstone | Artist Point (south rim), Lookout Point (north rim) | Morning light on Lower Falls from Artist Point | June-September (full water flow) |
| Teton Range reflection | Oxbow Bend, Schwabacher Landing, Jenny Lake | First 30 minutes after sunrise (still water) | June-October |
| Milky Way | Any open meadow away from lodges, Gros Ventre campground | After astronomical twilight (10:30 p.m. - 4:00 a.m.) | June-September (galactic core visible) |
The single most important variable in Yellowstone photography is not camera gear. It is being in the right location at the right time of day, which is a logistics problem, not a gear problem. A photographer at Artist Point at 7:00 a.m. with a phone will get a better Grand Canyon image than a photographer at Artist Point at 2:00 p.m. with a $5,000 body and a telephoto lens, because the morning light rakes across the canyon walls and turns the yellow rhyolite into gold while the afternoon light is flat and top-down. Multi-day tours solve this logistics problem by sleeping near the subjects and moving to them before sunrise.
Which multi-day tour gives photographers the best schedule?
A dedicated private summer wildlife photography safari is now included in this guide: four to five hours, ages 16+, with instruction available on request. For several days of wildlife observation, the BrushBuck four-day Wildlife Adventure is a broader alternative. Confirm the actual stop timing rather than assuming every viewpoint is visited at golden hour.
| Photography factor | BrushBuck Wildlife (4 days) | Bindlestiff Hotel-Based (5 days) | G Adventures Camping (6 days) |
|---|---|---|---|
| Pre-dawn starts | Yes, Lamar Valley dawn safari | Yes, wolf tracking day | No specified pre-dawn schedule |
| Golden-hour stops | Oxbow Bend, Hayden Valley evening | Varied, guide-dependent | Camp-based (campsite evenings) |
| Wildlife optics provided | Binoculars per guest + spotting scope | Vehicle with enlarged viewing windows | None specified |
| Night sky access | Limited (hotel-based) | Limited (hotel-based) | Excellent (camping, no light pollution) |
| Thermal features time | Moderate (wildlife-first itinerary) | Extensive (full thermal circuit) | Full day dedicated to geysers |
| Group size | Small group | 13 max | Small group |
The G Adventures camping tour has a hidden advantage for one specific type of photography: astrophotography. Camping inside the park at elevation, miles from the nearest lodge or town, puts you under some of the darkest skies in the lower 48 states. The Milky Way core is visible to the naked eye from Yellowstone campgrounds between June and September, rising in the southeast around 10:30 p.m. and arcing overhead by 2:00 a.m. A photographer willing to set an alarm and step outside the tent with a tripod and a wide-angle lens can capture images that are simply not possible from a hotel parking lot.
The Bindlestiff 5-day hotel-based tour covers the most geographic ground, running from Bozeman to Jackson through the entire park. That means it hits every major thermal basin (Norris, Mammoth, Old Faithful, Grand Prismatic, West Thumb) and both the Grand Canyon of the Yellowstone and the Grand Tetons. For a photographer who wants variety of subjects more than optimal timing at any single subject, this tour covers the widest range. The wolf tracking day with a local expert also provides a structured opportunity for wolf photography, though success depends on whether the packs are visible that day.
Choose around the photographs you want to make. A dedicated photography session offers instruction and a flexible subject focus; a multi-day wildlife itinerary gives more observation opportunities. Camping can help with night-sky plans, but it is not the only way to reach dark skies, and no reviewed camping itinerary guarantees an astrophotography session.
What camera gear should you bring for Yellowstone?
A Yellowstone photography kit needs three focal lengths: a wide-angle (14-24mm) for thermal features, landscapes, and night sky; a mid-range zoom (24-70mm or 24-105mm) for environmental portraits and geyser eruptions; and a telephoto (100-400mm or 150-600mm) for wildlife, which is almost always viewed from 100+ yards. If you can only bring one lens, a 24-105mm or 24-200mm range covers the most situations acceptably, though you will miss close wildlife shots without a 400mm+ telephoto.
| Lens / focal length | What it covers in Yellowstone | Weight trade-off |
|---|---|---|
| 14-24mm f/2.8 | Night sky, Grand Prismatic from overlook, canyon wide views, campfire scenes | ~1 lb, essential for astro |
| 24-70mm f/2.8 or 24-105mm f/4 | Old Faithful eruptions, boardwalk thermal features, environmental landscapes | ~1.5-2 lbs, most versatile |
| 100-400mm f/4.5-5.6 or 150-600mm | Wolves, bears, eagles, distant bison, Lower Falls from Artist Point | ~3-4 lbs, essential for wildlife |
| 1.4x teleconverter | Extends telephoto to 560mm-840mm for wolves at extreme distance | ~0.5 lb, loses 1 stop of light |
A sturdy travel tripod is non-negotiable for three situations: pre-dawn wildlife (shutter speeds drop below hand-holdable at dawn), Milky Way photography (15-25 second exposures), and long exposures of waterfalls at the Grand Canyon of the Yellowstone. Carbon fiber tripods in the 3-4 pound range handle all three without adding excessive weight to a day pack. If your tour involves hiking (the G Adventures tour summits Mt Washburn), a lighter tripod matters more than a heavier one with marginal extra stability.
Cold can shorten battery life. Bring spares and confirm your charging arrangements, especially on camping trips where outlets may be limited. Battery performance varies; there is no useful universal altitude-based percentage to budget against.
Lens cleaning is a constant task near thermal features. Steam from geysers and hot springs condenses on cold glass instantly, and the mineral content in the steam leaves a film that a dry cloth will not remove. Bring pre-moistened lens wipes (not just a dry microfiber cloth) and keep them accessible, not buried in the bottom of a pack. Shooting from upwind of a thermal feature reduces the problem but does not eliminate it. Some photographers use a UV filter as a sacrificial layer in geyser basins, removing it for clean shots at other locations.
How do you photograph Grand Prismatic Spring properly?
Grand Prismatic Spring produces its famous ringed colors (blue center, yellow-orange-green bacterial mats) most vividly when viewed from above on a warm, calm day with the sun high, which means the Grand Prismatic Overlook trail at midday between June and September is the shot, and any other angle or time will produce a steam-obscured version of what you were expecting. This is the single most common disappointment in Yellowstone photography: arriving at boardwalk level on a cool morning and seeing nothing but white steam.
The Grand Prismatic Overlook trail is a 1.2-mile round-trip path that climbs a hillside south of the spring, reaching an elevation about 100 feet above the water surface. From this vantage point, you look down into the spring and see the full color gradient without steam interference. The trail was built specifically to provide this overlook, and it is the only angle that produces the aerial-style image most people associate with Grand Prismatic. The boardwalk at water level, which is where most visitors stand, gives you a close-up of the bacterial mats but no overview of the pattern.
Timing matters more here than at any other Yellowstone feature. On a cool morning (below 60 F air temperature), the temperature difference between the 160 F spring water and the air produces thick steam that obscures the colors completely. By midday on a warm day (air temperature above 70 F), the steam thins enough to see the colors from the overlook. A calm day matters because wind pushes the steam across the spring in one direction, potentially clearing one side while obscuring the other. The ideal conditions are a warm, calm midday in July or August.
| Condition | Effect on photography | Best response |
|---|---|---|
| Cool morning, heavy steam | Colors invisible, white cloud over the spring | Wait until midday or return a different day if your tour allows |
| Warm midday, light breeze | Optimal: colors fully visible from overlook, steam minimal | Shoot from the overlook trail, use a polarizer to cut glare |
| Windy day | Steam blows across the spring, half visible, half obscured | Shoot from the upwind side of the overlook |
| Overcast sky | Colors are muted compared to direct sun but still visible | Increase saturation slightly in post, avoid heavy edits |
A circular polarizing filter is the single most useful accessory for this shot. It cuts the surface glare on the water and deepens the blue center of the spring. Rotate it while looking through the viewfinder until the blue intensifies and the reflection disappears. The effect is dramatic, turning a washed-out blue into a deep cobalt. No amount of post-processing replicates what a polarizer does in-camera at this specific subject. The geyser tour guide covers the full thermal circuit including Grand Prismatic's geology and what makes those colors appear.
How do you photograph Yellowstone wildlife without a 600mm lens?
The practical minimum for identifiable wildlife photographs at Yellowstone's mandated viewing distances (100 yards for bears and wolves, 25 yards for bison and elk) is a 200mm lens for bison (which are large enough to fill the frame at 25 yards) and 400mm for bears, wolves, and smaller subjects. A 100-400mm zoom handles both cases. If you do not own a telephoto, renting one for the trip is more practical than buying one you will use once.
Bison are the easiest wildlife subjects because they are large, slow-moving, and ubiquitous. A 70-200mm lens on a crop sensor (equivalent to 105-300mm full-frame) produces a frame-filling bison image at 25-50 yards without any difficulty. The challenge with bison is not reach; it is timing. A bison standing still in flat midday light produces a boring image. A bison silhouetted against the rising sun in Hayden Valley, backlit steam rising from its wet fur, produces an image with real atmosphere. The BrushBuck tour's early-morning Hayden Valley stop puts you in position for exactly that kind of light.
Wolves are the hardest subject. They are typically spotted at 400-1,000 yards in the Lamar Valley, often as dark shapes moving across distant hillsides. At those distances, a 600mm lens produces a wolf that occupies maybe 5% of the frame. The serious wolf photographers who set up in the Lamar Valley pullouts each morning use 800mm+ lenses on tripods, and even they depend on the wolves cooperating by coming closer. On a guided tour, the naturalist's spotting scope gives you a clear view through the eyepiece, but translating that scope view into a photograph requires your own long telephoto mounted on your own tripod.
| Subject | Typical viewing distance | Minimum lens (full frame) | Ideal lens |
|---|---|---|---|
| Bison | 25-100 yards | 70-200mm | 100-400mm |
| Elk | 25-200 yards | 200mm | 100-400mm |
| Grizzly bears | 100-300 yards | 400mm | 150-600mm |
| Wolves | 400-1,000 yards | 600mm | 800mm+ with teleconverter |
| Moose | 50-200 yards | 200mm | 100-400mm |
| Bald eagles / osprey | 50-300 yards | 400mm | 150-600mm |
Renting a telephoto lens for a week costs roughly $100-$200 from online rental services that ship to your home. A 150-600mm f/5-6.3 from Tamron or Sigma in a rental covers every wildlife scenario in Yellowstone and weighs about 4.3 pounds. Order it delivered to your home a few days before departure so you can test it before the trip. Return shipping is usually included in the rental fee. This is more practical than buying a $1,500-$2,000 lens you may not use again until your next national park trip.
What are the best times of day for each type of Yellowstone photograph?
Dawn (5:30-7:30 a.m.) is for wildlife. Midday (11:00 a.m.-2:00 p.m.) is for thermal features. Golden hour (6:00-8:00 p.m.) is for landscapes. Night (10:30 p.m.-3:00 a.m.) is for the Milky Way. These windows do not overlap, which is why a multi-day tour produces better photographs than a day trip: you can cover each subject at its optimal time on a different day rather than trying to cram everything into one twelve-hour window.
| Time window | Best subjects | Why this time works | Which tour puts you there |
|---|---|---|---|
| Pre-dawn to 7:30 a.m. | Wolves, bears, elk, moose | Animals are most active, low-angle light creates drama, fewer tourists | BrushBuck (Lamar Valley dawn), Bindlestiff Hotel (wolf tracking day) |
| 8:00 a.m. - 10:00 a.m. | Grand Canyon of the Yellowstone, waterfalls | Morning light rakes across the yellow rhyolite walls from the east | All three tours include Grand Canyon stops |
| 11:00 a.m. - 2:00 p.m. | Grand Prismatic, thermal basins | Warm air reduces steam, overhead sun reveals colors | Bindlestiff Hotel (full thermal circuit), G Adventures (geyser day) |
| 3:00 p.m. - 5:00 p.m. | Old Faithful (if eruption aligns) | Side light on the steam column creates depth and texture | All three tours time an Old Faithful visit |
| 6:00 p.m. - 8:00 p.m. | Teton Range from Oxbow Bend, landscape vistas | Golden light, calm water for reflections | BrushBuck (Oxbow Bend evening), Bindlestiff Hotel (Grand Tetons) |
| 10:30 p.m. - 3:00 a.m. | Milky Way, star trails | Astronomical darkness, galactic core position | G Adventures Camping (campsite, no light pollution) |
The Old Faithful eruption is worth a specific note on timing. The eruption itself lasts about 2-5 minutes and shoots water 100-180 feet in the air. The best photographic angle depends on the sun position and the wind direction, since the steam plume can block the background if the wind pushes it toward your shooting position. The south and east benches offer the best angles for afternoon eruptions because the sun backlights the steam from the west, creating a glowing plume against a dark background. For morning eruptions, the north bench works better because the rising eastern sun lights the column from behind your shoulder.
A remote shutter release or your camera's built-in timer is useful for all long-exposure work: waterfalls at the Grand Canyon, night sky images, and any scenario where you are shooting from a tripod. Even pressing the shutter button introduces vibration that shows up in telephoto shots and long exposures. A simple cable release or the camera's 2-second timer mode eliminates this problem for free. The Jackson Hole departure guide and the Bozeman departure guide cover the logistics of reaching each gateway with gear.
For winter photography tours, the rules shift entirely. Steam from thermal features is dramatically thicker against sub-zero air, creating enormous billowing clouds. Bison coated in frost make iconic images. Wolves on snow are the holy grail. But battery life drops by 50% or more, metal tripod legs can freeze to bare skin, and condensation when moving a cold camera into a warm vehicle or lodge can fog lenses and mirrors for thirty minutes. Winter photography in Yellowstone is rewarding but requires different preparation than summer. You can explore all Yellowstone tour packages to compare summer and winter options side by side.